Usage of the node
The algorithm that calculates the high resolution output using the lower resolution input material is pre-trained on lots and lots of images/sequences during the creation of the software. The only input to the algorithm is the low resolution material, and hence there are no knobs to tweak the upscaled result. The plugin is hard coded to do a 4x upscale of the input material. To produce the upscaled result, you simply feed it a RGB(A) image/ sequence to the only input of the node. The node supports processing of any RGB layer, which means that you can feed multiple layers of RGB material through it at the same time, and write it out using a standard Write node set to “channels: all”.
As of v2.5.0 it is also possible to process CG with alpha channels (RGBA) using sequence mode. You have to set the “type” knob to either “CG” or “Hybrid” to get the alpha processed together with the RGB channels.
The knobs that do exist on the plugin to tweak by the artist are mostly related to being able to scale up pretty large resolution images using limited VRAM on the graphics card. The neural network requires pretty large amounts of memory even for small resolution input images. To be able to scale up, for example, a 1K input to 4K the image needs to be split up into several passes/patches to fit into memory. This is all done and handled transparently “under the hood” so the artist can focus on more important things. You might need to tweak the settings though depending on the use case and available hardware on your workstation.
Video introduction to the knobs:
mode
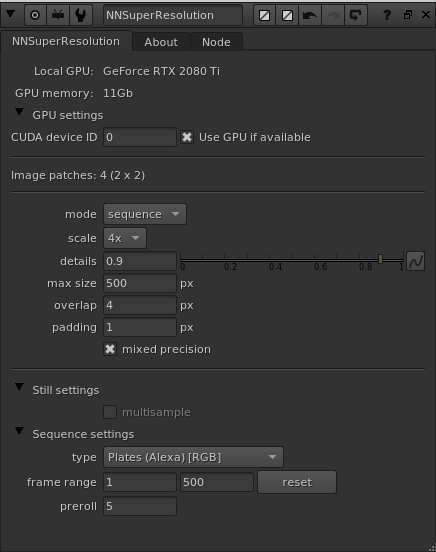
The default mode is still mode. This is best for upscaling still photos, textures, patches and similar material. When you are processing sequences, i.e. filmed video material, you want to change the mode knob to “sequence”. This activates a different way of processing than when in still mode. While the sequence mode doesn’t produce as detailed and sharp still frames as the still mode, it does create temporally stable results instead. This is hugely beneficial when you got moving material, for example when doing VFX work.
max size
Max size sets the maximum dimension, in one direction, that an image patch can have and is the single most important knob on the plugin. The default is 500, which means that the max dimensions an input patch would be allowed to be is 500×500 pixels. From our experience that will use up to around 8Gb of VRAM on your graphics card. If you haven’t got that available and free the processing will error out with a CUDA memory error, and the node in Nuke will error in the DAG. To remedy this, and also to be able to input resolutions much higher than a single patch size, you can tweak the max size knob to adapt to your situation. You can lower it to adapt to having much less VRAM available. The plugin will split the input image into lots of smaller patches and stitch them together in the background. This will of course be slower, but it will make it possible to still run and produce much larger results. There is a text status knob above the “max size” knob (in between the two dividers), that will let you know how many image patches the plugin will run to create the final upscaled image.
overlap
Since the plugin will run multiple patches through the neural network, there will be lots of edges of image patches present. The edges doesn’t get as satisfying results as a bit further into an image from the edge. Because of this, all these multiple patches that get processed are done so with some spatial overlap. The overlap knob value sets the number of pixels (in the source image resolution space) of the patches’ overlap. The default of 4, which in the resulting high res image is 16 pixels, is usually a good value.
padding
The padding is very connected to the overlap above. While the overlap sets the total amount of pixels the patches overlap, the padding then reduces the actual cross fading area where the patches are blended to not use the very edge pixels at all. The padding is also specified in pixels in the source resolution, so the default value of 1 actually means that the 4 edge pixels in the high res result of each patch will be thrown away. This way of blending all patches together has proven very successful in our own testing.
mixed precision
This is a new knob since v3.2.0. When this is “on” (which is default) the plugin will try to use mixed precision on the GPU for calculations. What this means is that for certain supported calculations, the GPU will process data using half floats (16 bit) instead of normal full floats (32 bit). This results in a bit less VRAM usage and faster processing, for the little cost of a slightly less accurate result. You usually won’t notice the difference in quality at all, but the resulting processing speed can be, for example, 15% faster. The actual speed difference depends on your exact GPU model.
If you are getting CUDA processing errors, please try to process the same material but turning off mixed precision.


Still mode: multisample
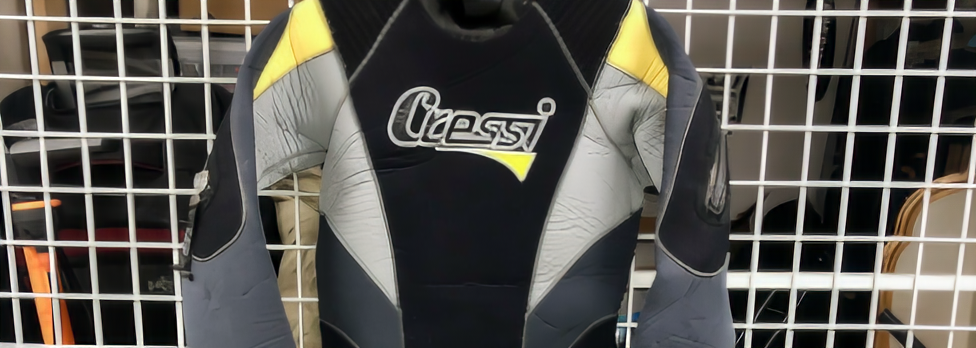
The default value of the multisample knob is “off” which means that each image patch is run through the upscale algorithm once. This usually produces nice and sharp still images. Sometimes it’s more beneficial to get a bit less sharp but smoother results instead. When multisample is “on” it will instead run each image patch through the upscale algorithm 4 times but first pre-process the patch by orienting it differently (using rotations and mirrors). This will of course make the process much slower, but it will in some situations be worth it. You have an example result with multisample on in the before & after image above (the rightmost image) picturing the wetsuit.
Sequence mode: type
Using the type knob, you can specify what type of material you want to process. If you want to process filmed material, you can choose between “Plates (Alexa) [RGB]” and “Plates (Legacy) [RGB]”. We recommend the “Plates (Alexa) [RGB]” option since that is using a newer and better performing neural network that was released in v.2.5.0, producing sharper and better detailed results. This has been made possible by retraining the whole neural network solution using a lot more, and a lot higher quality, real filmed plates shot using the Arri Alexa motion picture camera. We do still provide the “Plates (Legacy) [RGB]” option for backwards compatibility (basically it’s exactly the same network as earlier versions than v.2.5.0 was shipping with).
If you want to process computer generated images, i.e. rendered 3D graphics with alpha channel support, you can choose between “CG (beta), [RGBA]” and “Hybrid (Alexa+CG, beta), [RGBA]”. The first option is using our newly trained CG neural network for all channels. (We have marked this option as “beta” right now because it’s still being evaluated, but so far we are very happy with the results). The second “hybrid” option is using the “Plates (Alexa)” solution mentioned above for the RGB channels, while the A channel is produced using the CG trained neural network solution.
Sequence mode: frame range
When you are using sequence mode, it’s very important to set the frame range of the input material correctly. Since the algorithm need to gather neighbouring frames it needs to know the extend of the material it can use to best be able to produce a good result. If you are trying to view/process a frame outside of the specified frame range it will render black.
Sequence mode: preroll
The preroll is specifying how many frames before the current frame that is used to produce the current frame’s upscaled result. Since the algorithm is temporal it is a bit more complex than that. Basically the plugin will use the number of preroll frames if you jump straight into a random frame in a sequence. It will then need to run the whole upscale process for all the preroll frames before it can produce the current high res frame. This is how it’s making sure the result is highly detailed and also temporally stable. Doing this takes a lot of processing power and is not something we want to do for every frame. To be efficient the current frame’s high res result is cached internally in the plugin. So if you then step to the next frame in the timeline it will use the cache and will directly be able to process the frame.
To put it short and clear: The plugin will need to process the preroll amount of frames before the current one if the previous frame hasn’t been processed just before (and hence resides in the cache). Because of this the first frame will take much longer to process, but if you then step to the next frame one at a time the processing will be faster. Because of this, you do want to keep a pretty high batch count (frame range of a processing chunk) when you upscale material using the plugin in a farm environment. If you are rendering locally it will just work as long as you are rendering all consecutive frames in a sequence.
CUDA device ID
This is a new knob since v3.2.0. This knob specifies what GPU to use in the system by its CUDA device ID. It’s only relevant if you got multiple GPUs installed in the system. The default value is 0, which is the default CUDA processing device, usually the fastest/most modern GPU installed. Please refer to the output of running the command “nvidia-smi” in a terminal for retrieving the info of the specific GPU device IDs you have assigned to your GPUs in your particular system.
Use GPU if available
There is another knob at the top of the plugin called “Use GPU if available”, and it’s “on” by default (recommended). This knob is only present if you’ve installed a GPU version of the plugin. This knob is not changing the upscale behaviour, but rather how the result is calculated. If it is “on” the algorithm will run on the GPU hardware of the workstation, and if it’s “off” the algorithm will run on the normal CPU of the workstation. If the plugin can’t detect a CUDA compatible GPU, this knob will automatically be disabled/greyed out. This knob is similar to the one you’ll find in Foundry’s own GPU accelerated plugins like for example the ZDefocus node.
We highly recommend always having this knob “on”, since the algorithm will run A LOT faster on the GPU than on the CPU. To give you an idea of the difference, we’ve seen calculation times of the same input image be around 10 secs using the GPU and about 6 minutes(!) on the CPU. These numbers are just a simple example to show the vastly different processing times you will get using the GPU vs. the CPU. For speed references of processing, please download and test run the plugin on your own hardware/system.