Usage of the node
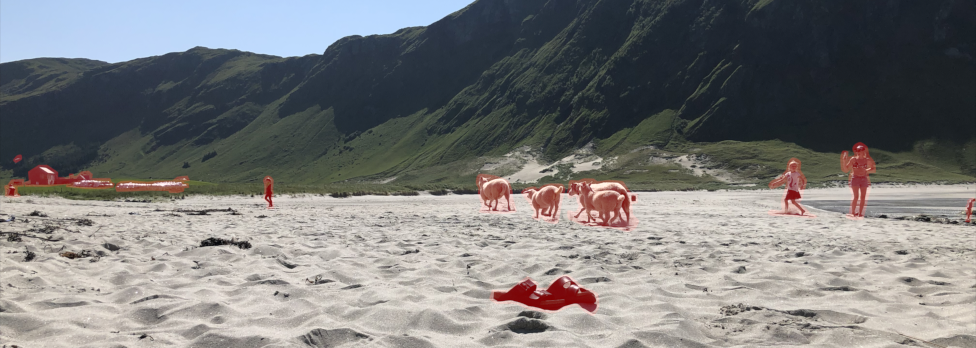
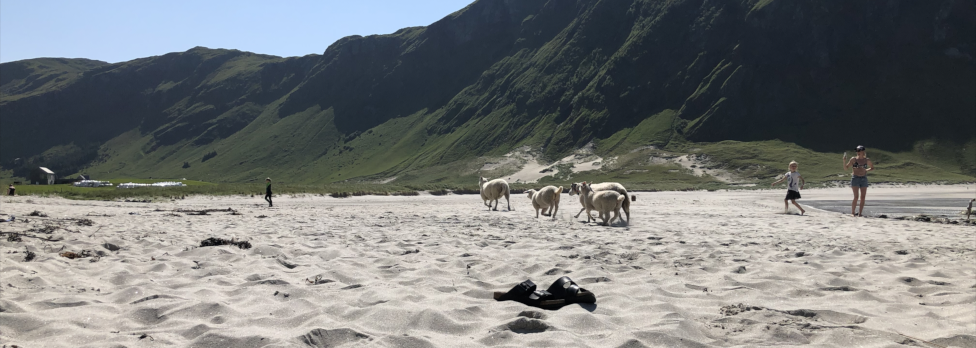
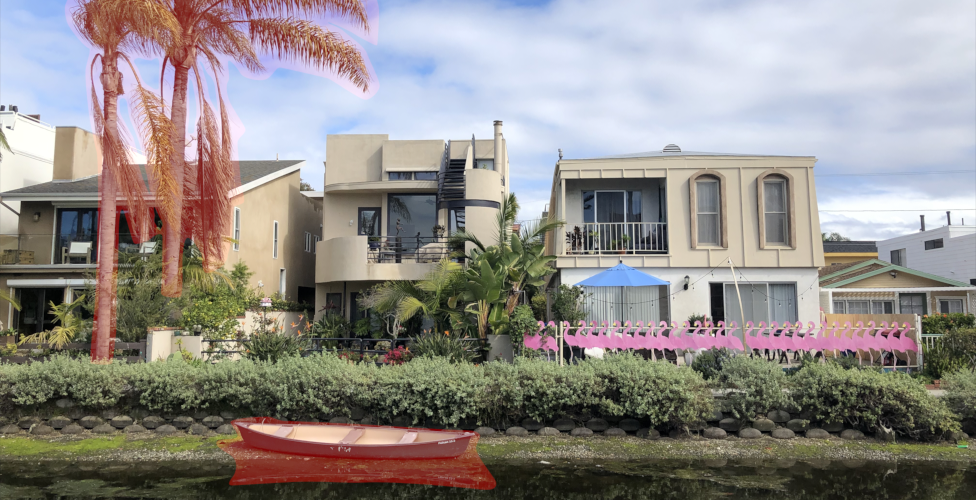
The NNCleanup node is an advanced inpainting type of node. This means that its purpose is to create new content for the user specified regions (using the matte input’s alpha channel) in a still image. NNCleanup is internally using modern machine learning / artificial intelligence algorithms to construct a plausible new area for the specified region. Due to the nature of how the neural networks are trained, the result of this process usually give you an image that visually still make sense but with the object(s) that resided in the specified area fully removed. This ability to cleanup areas from objects is what has given the node its name NNCleanup. Worth pointing out is that the node is made to work on still images only, i.e. it’s not temporally stable if you render a sequence of frames that got movement in them.
Knob reference
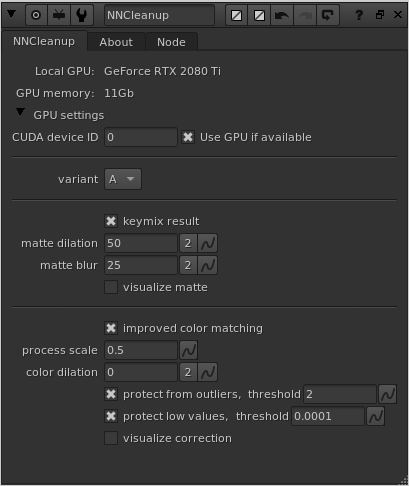
There are not that many knobs available in NNCleanup, but here we’ll go through the ones that you do have available. Most of them are about controlling how you want to keymix in the new inpainted area, and if you want to apply some extra color matching features or not.
variant
The only way you can actually tweak the outcome of the neural network part of the process is by changing the “variant” knob. By selecting different variants, you are literally loading different training results of the neural network. The different variants will give you pretty similar results, but still different. Different enough to work better or worse on specific image material. If you got the time, it’s always worth stepping through all the variants, to then pick the one that created the best result for your particular situation. If you are short on time, go with the default value of “A”.

process
This knob defines the region that needs to be processed by the inpainting neural network. The default is “Full frame” to be able to do cleanup anywhere in the frame. While this is nice and easy, it’s taking more processing time and quite a lot of GPU memory. If you haven’t got that much GPU memory, or you need to process very high resolution images (for example 4K material or higher), you likely need to optimize the processing region to something smaller than full frame. You can choose between “Specify region” to manually define a processing bounding box, or you can choose “Matte input’s bbox” to automatically drive the processing region by the bounding box of the matte input’s material (i.e. the alpha channel you are using as the matte to NNCleanup). If this is setup in an optimized way, the alpha should have a tight bounding box around itself already.
process region
This knob is available when you choose “Specify region” using the “process” knob described above. You can then manually specify a processing region / bounding box for what needs to be processed. Only matte regions from the input that reside inside of this bounding box will be processed by the plugin. This can make the processing much faster, but more importantly make it consume way less GPU memory than processing the full frame. You can for example specify a 1K square region in the upper right corner of a full frame 4K material, if the objects that needs removal are locally situated there.
bbox padding
This knob is available when you choose “Matte input’s bbox” using the “process” knob described above. You can then specify a padding value to grow the matte input’s bbox region by using this knob. This is because an automatic bbox around, for example, a Roto node’s output is very tight. The NNCleanup node needs more surrounding context around the area it is inpainting to be able to do a good job. The default padding value is 100.
process scale
Process scale defines at what resolution the image is running its inpainting process at. The default is 1.0, meaning it is processing in full native resolution (same resolution as the image is input). If you got a very high resolution image, processing in full resolution will consume a lot of GPU memory, so it might be needed to internally downscale the image before the inpainting process is run (you might otherwise run out of “CUDA memory”). There could also be inpainting quality benefits from processing it in lower resolution internally because the neural network is trained using rather small patches. The result is always upscaled back to the input resolution by the plugin, before it’s keymixed back with the input.
keymix
This toggles “keymix mode” on/off. If it’s off you will get the full result of the neural network, i.e. the whole image is processed. This is not recommended because the network will alter areas that you haven’t specified using the matte input. This is just the nature of machine learning, i.e. processed stuff is not 100% static but tend to be slightly adjusted because of all the complex processing it’s going through. The gist of it is that you should pretty much always have keymix “on”, which will softly keymix in the produced inpainted area into your original image.
(keymix) matte dilation
This dilates/grows the input matte before it’s used for the keymix operation.
(keymix) matte blur
This blurs the input matte before it’s used for the keymix operation.
visualize keymix matte
If you turn this knob “on”, it will draw a red semi-transparent area onto your image that visualizes the processed matte input that is used for the keymix operation. This is good for being able to easily fine tune the matte dilation and matte blur knobs mentioned above.
improved color matching
The neural network doesn’t always produce 100% correct color matched results to its neighbouring areas, i.e. it might give you slight color and luminance shifts (this is easier to see if you turn matte dilation and matte blur all the way down to 0). Switching “improved color matching” on will enable some extra color processing that tries to match the inpainted area much more closely to the surrounding areas of the original input image. This is a bit of a slow process that makes the rendering of the plugin about twice as long. So if you are working interactively with defining the input alpha, we recommend turning this “off” until you are done with altering the matte input. Then turn it “on” again before rendering/pre-comping the result.
(color) process scale
This defines at what scale the “improved color matching” process is calculated at. The larger you go with the value here, the slower the process will run. 1.0 represents “full resolution”, 0.5 “half res”, 0.25 “quarter res” and so on. We recommend values somewhere around 0.25-0.5. If you are getting artefacts with this feature give if a go at 1.0.
(color) protect low values
In some particular situations, the “improved color matching” process can introduce artefacts in very low value/dark areas. Turning this checkbox “on” will protect these very dark values, keeping them out of the color matching process.
(color, protect low values) threshold
This value sets the threshold of what is considered “low values” for the “protect low values” feature described above.
CUDA device ID
This is a new knob since v1.5.0, and it’s only present if you’ve installed a GPU version of the plugin. This knob specifies what GPU to use in the system by its CUDA device ID. It’s only relevant if you got multiple GPUs installed in the system. The default value is 0, which is the default CUDA processing device, usually the fastest/most modern GPU installed. Please refer to the output of running the command “nvidia-smi” in a terminal for retrieving the info of the specific GPU device IDs you have assigned to your GPUs in your particular system.
Use GPU if available
There is another knob at the top of the plugin called “Use GPU if available”, and it’s “on” by default (recommended). This knob is only present if you’ve installed a GPU version of the plugin. This knob is not changing the motion vector output, but rather how the result is calculated. If it is “on” the algorithm will run on the GPU hardware of the workstation, and if it’s “off” the algorithm will run on the normal CPU of the workstation. If the plugin can’t detect a CUDA compatible GPU, this knob will automatically be disabled/greyed out. This knob is similar to the one you’ll find in Foundry’s own GPU accelerated plugins like for example the ZDefocus node.
We highly recommend always having this knob “on”, since the algorithm will run A LOT faster on the GPU than on the CPU. To give you an idea of the difference, we’ve seen calculation times of the same input image be around 2.0 seconds/frame using the GPU and about 34 seconds/frame on the CPU (a difference factor or 17x slower on the CPU). These numbers are just a simple example to show the vastly different processing times you will get using the GPU vs. the CPU. For speed references of processing, please download and test run the plugin on your own hardware/system.