One of the big news in v3.0 is the addition of the node NNFlowVectorWarp. This is our own take on a node with similar abilities to NukeX’s VectorDistort, but being tailor made and optimized for the vectors produced by the NNFlowVector node (especially the new “AAA” model variant). With the NNFlowVectorWarp node you can track/warp patches onto live action footage, you can stabilize live action footage as well as warp stabilized footage back to it’s original motion. You can also output STMaps of the warps produced, to be able to apply the warps in a very efficient and optimized way using the classic STMap node (part of Nuke’s default toolset). We always recommend pre-rendering both the vectors from the NNFlowVector node and also the STMaps produced from the NNFlowVectorWarp node, to depend on fast disk read and fast/lean warp algorithms instead of depending on these very heavy calculations in a live comp environment.
Usage of the Node
The way the NNFlowVectorWarp node works is that you feed it with either normal “motion vectors” or “smart vectors”, which you input to the node’s input named “vectors”. You then set a “reference frame” to what frame you want it to lock onto. The reference frame is the frame that will be non-deformed that the rest of the time line will reference.
There are two different modes you can use, either “Warp” or “Stabilize” (you can think of it as “forward warp” and “inverse warp” if you like). Both these modes either work on provided image material, or produces STMaps directly (for pre-rendering and later use with the classic STMap node in Nuke). If you produce STMaps directly, you don’t need to connect anything to the “img” input. If you instead choose “Warped src” or “Stabilized src” it will apply the warps directly onto the material provided into the “img” input. There is a neat special case where, if you use the mode “Stabilized src”, and don’t connect anything to the “img” input, it will instead use both the vectors AND the RGB(A) channels from the “vector” input. This is very nice when you want to stabilize a sequence that you already pre-rendered from NNFlowVector, because that node by default also outputs the beauty RGB(A) channels. This way you can have a very slick and simple processing comp script as such:
Read > NNFlowVector > Write (channels: all) > Read > NNFlowVectorWarp (only connected using the “vector” input, and set to “Stabilize src”) > Write (fully stabilized plate)
Knob reference
The following are the available user knobs on the NNFlowVectorWarp node.
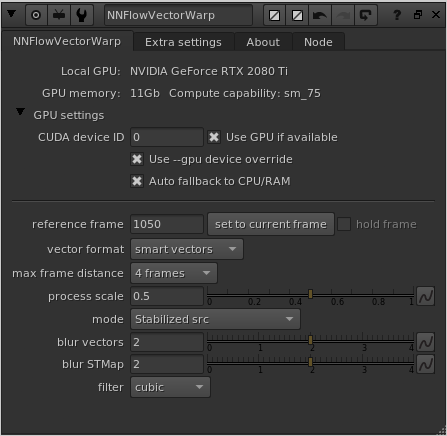
reference frame
The reference frame is the most important knob on the node, hence being the first. This sets which frame should be treated as the hero reference, i.e. the frame that should not be deformed/distorted/warped but that every other frame on the timeline references/relates to.
There is a convenience button next to this knob called “set to current frame” which does exactly that. Just press it to set the current frame as the value of the “reference frame” instead of typing it manually. The node also defaults to setting the “reference frame” to the current frame when the node is created.
hold frame
The checkbox “hold frame” is only relevant when using the mode “Warped src”. If it’s “on” it basically acts as a FrameHold node on the “img” input, set to the same frame as the “reference frame”. The default is “off” because quite often you want the full sequence, that is being input to the “img” input, to be warped. But it’s good to have the convenience option available.
vector format
The vector format knob specifies what format of vectors that are input into the “vectors” input. Basically it defines if the node should work using classic “motion vectors” or if it should work using “smart vectors”. Set it to whatever you have set the upstream NNFlowVector node to. The two options work similarly, but not exactly the same. The “motion vectors” are vectors that only describe the movement from one frame to another (both forward and backward in time). “Smart vectors” on the other hand describe the same things as motion vectors, but then in addition it describes bigger jumps between frames as well, with distances being 2, 4, 8, 16, 32 and 64 frames. The smart vectors enables the warp algorithm to optimize heavily and not having to do as many iterative warping steps as with motion vectors. This also makes it read less frames of vectors from disk, so the I/O becomes faster as well. If you can, please do experiment with “smart vectors” in favor of “motion vectors”, and test different “max frame distance” steps, like for example 2, 4 or 8.
max frame distance
This is related to the information above (the “vector format” knob). Basically this knob sets how big “frame distance” jumps it is allowed to do when using “smart vectors” as the vector input. You also have to provide the node with matching frame distances, i.e. if you want to use “max frame distance” 16 you also have to provide the node with a pre-render of vectors that contain “frame distances” up to 16. If you set the “max frame distance” to 16, and you only provide it with vectors that supports up to frame distance 4, for example, it will automatically fall back to frame distance 4 instead (without erroring).
process scale
The process scale sets the internal “working resolution” as a scale factor of the input resolution. If you, for example, feed the node with UHD (3840×2160) and set the process scale knob to 0.5 (which is the default), the node will calculate all the warping internally in full HD (1920×1080) and then scale the resulting STMap back up to full resolution in the end. If you are using a mode that is producing warped images as output instead of the STMaps, it’s good to know that all the warping always happens in full resolution. Basically it’s only the calculation of the internal STMap that is done at the process scale resolution. The benefit of not always calculating the STMap in full resolution is twofold, more specifically speed and less memory usage. Storing the internal vectors when process scale is set to 0.5 is only using 25% of the memory, and the calculations goes a lot faster. In most common cases, you are not even loosing important details, but is only reaping the benefits of the improved performance. Please see the “blur vectors” and “blur STMap” knob descriptions below for some related information.
mode
The mode is probably the second most important knob after the reference frame. This sets what the output of the node should be. Are we forward warping or are we stabilizing? Are we processing footage that is input using the “img” input, or are we producing STMaps to be used later on? The four different modes are the following:
– Warped src – Warping the footage provided using the “img” input
– STMap (warp) – Producing STMaps for forward warping
– Stabilized src – Stabilizing the footage provided using the “img” input. If no input is provided, the node will instead use the RGB(A) channels from the “vector” input for your convenience.
– STMap inverse (stabilize) – Producing STMaps for stabilizing
blur vectors
This is a pre-blur of the provided vectors to be able to easily filter too high frequency vectors. Basically you can get rid of some small jitter, without trading overall tracking precision, if you do blur the input vectors slightly. Usually a small value between 0 and 4 is good, but what value to use is very depending on what material you are processing of course. If you are unsure, just use the default value 2.
blur STMap
This is a post-blur of the resulting/calculated internal STMap, but after it has been scaled up to be full resolution again. If the process scale was smaller than 1.0, it is usually a good idea to do a bit of blurring of the STMap, just to slightly smooth the upscale filtering artifacts. Do experiment with values between 0 and 4 to find what best fits your material. The default is set to 2.
filter
This setting is only relevant when using the modes for processing footage, i.e. “Warped src” and “Stabilized src”. It is defining what filter to use for the warping of the material when applying the internal resulting STMap. This will produce the exact same result as if you instead output the STMap, and then later using a classic STMap node in Nuke and set the filter knob in that node to the same value as this filter knob.
CUDA device ID
This knob is only present if you’ve installed a GPU version of the plugin. This knob specifies what GPU to use in the system by its CUDA device ID. It’s only relevant if you got multiple GPUs installed in the system. The default value is 0, which is the default CUDA processing device, usually the fastest/most modern GPU installed. Please refer to the output of running the command “nvidia-smi” in a terminal for retrieving the info of the specific GPU device IDs you have assigned to your GPUs in your particular system.
This knob does NOT exist in the macOS build (since the macOS build is accelerated by MPS instead of CUDA).
Use GPU if available
There is another knob at the top of the plugin called “Use GPU if available”, and it’s “on” by default (recommended). This knob is only present if you’ve installed a GPU version of the plugin. This knob is not changing the output of the node, but rather how the result is calculated. If it is “on” the algorithm will run on the GPU hardware of the workstation, and if it’s “off” the algorithm will run on the normal CPU of the workstation. If the plugin can’t detect a CUDA compatible GPU, this knob will automatically be disabled/greyed out. This knob is similar to the one you’ll find in Foundry’s own GPU accelerated plugins like for example the ZDefocus node.
Use –gpu device override
This is a new knob in v3.0, and is there to help with batch rendering on systems with multiple GPUs. When this knob is set to “on” (which is the default), then node will not blindly use the device ID set in the knob “CUDA device ID” but will rather adhere to the –gpu command line parameter. This means that NNFlowVector will behave like Foundry’s own GPU accelerated nodes, and render using the specified GPU in the Nuke batch render command. This enables you to have a setup in the GUI, when you are working with the node as an artist, but still be able to farm the exact same Nuke script on different boxes with different GPU configurations.
Auto fallback to CPU/RAM
When this is “on” (default) together with when “Use GPU if available” is “on”, the node will check if the needed vectors can fit in the currently available GPU VRAM. If they can’t fit, the node will automatically fallback to processing on the CPU and normal RAM instead of erroring. This could be the preferred way, if you are prioritizing getting a result (even if the processing might take longer). It could also not be the preferred way, if you rather have the node erroring in such a case, for example when batch rendering in a farm environment. You might want it to error, so another machine with a larger GPU can pick up the frame and process it instead. The option is there for you to use accordingly.
Worth noting is that half of the processing might be accelerated using the GPU, and the other half using the CPU/RAM. This can happen if you are stabilizing and using the “hybrid method” which basically uses both forward and backwards vectors at the same time. It could then be that the forward vectors can fit into the GPU VRAM, but after they have transferred, the backward vectors can’t fit and has to stay on the CPU/RAM path.
Please note that there is another related knob called “CPU fallback memory factor” that is documented a bit further down (since it’s in the “Matte / Extra” tab).
The “Extra settings” tab’s knobs:
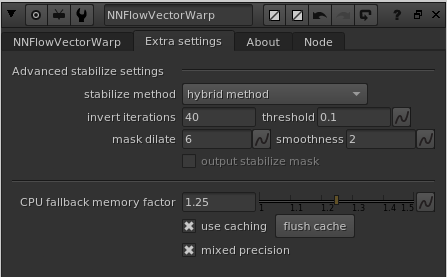
stabilize method
This knob is part of the “Advanced stabilize settings” group, which means it’s only related to when you are using stabilization as the mode. This drop down menu has three options;
- prio round-trip/reversability: This mode stabilizes the material, but prioritizes being able to warp it back to the original as close as possible.
- prio reference matching: This mode stabilizes the material, but prioritizes matching the reference frame as closely as possible.
- hybrid method: This mode is the recommended mode (default), and is doing an automatic split between both of the other methods. Basically best of two worlds. You should very rarely need to change from using “hybrid method”.
invert iterations
This knob is part of the “Advanced stabilize settings” group, which means it’s only related to when you are using stabilization as the mode. In addition, this setting is only related to when you have set “stabilize method” to either “prio round-trip/reversability” or “hybrid method”. This knob is for tweaking the number of iterations in an internal solver for the round-trip convergence. You will probably never need to change it from the default value of 40. (We might even hide this knob in a future release).
threshold
This knob is part of the “Advanced stabilize settings” group, which means it’s only related to when you are using stabilization as the mode. In addition, this setting is only related to when you have set “stabilize method” to “hybrid method”. The threshold is defining an internal error threshold that is used for automatically creating the split keymix alpha that is used by the “hybrid mode” to mix between the other two modes. The default value of 0.1 should be fine for most situations.
mask dilate
This knob is part of the “Advanced stabilize settings” group, which means it’s only related to when you are using stabilization as the mode. In addition, this setting is only related to when you have set “stabilize method” to “hybrid method”. The mask dilate knob sets how many pixels the calculated split keymix alpha is dilated before it’s used.
smoothness
This knob is part of the “Advanced stabilize settings” group, which means it’s only related to when you are using stabilization as the mode. In addition, this setting is only related to when you have set “stabilize method” to “hybrid method”. The smoothness knob sets how much the calculated split keymix alpha is blurred before it’s used. The default value of 2 should be fine in most cases.
output stabilize mask
This knob is part of the “Advanced stabilize settings” group, which means it’s only related to when you are using stabilization as the mode. This knob is specifically only enabled when you output a stabilization STMap from the node, and the “stabilize method” above is set to “hybrid method”. When the checkbox is set to “on” the node will use the B channel of the output STMap (which is an unused channel in general) to fill it with the split keymix alpha that is used for the hybrid mode to mix the other two different methods. The reason this option exists is so you can get a visualization of what the other knobs above actually do to the split keymix alpha. Since the B channel is not used when warping with an STMap, it doesn’t matter if you leave this “on” or “off”.
CPU fallback memory factor
This knob is related to the “Auto fallback to CPU/RAM” knob described above. If that knob is “on”, this “CPU fallback memory factor” knob is enabled. Here you can set how much safety margin you want the node to use when deciding if the retrieved vectors should be processed on the GPU or not. The default value of 1.25 basically means that it needs to exist 25% extra headroom of available GPU VRAM if the vectors and the following calculations should be done using the accelerated GPU path, otherwise the processing will happen using the slower CPU and normal RAM path.
use caching
This knob turn the internal caching “on” or “off”. The default is “on” which we very much recommend having. The cache saves as much intermediate vector data that it can reuse as possible. Quite often you are jumping between consecutive frames, and the speedup the use of a cache is making in such a case is huge.
flush cache
You should never need to flush the cache manually because the cache handling internally in the node is fully automatic. But we leave this button here if the need suddenly arise.
mixed precision
When mixed precision is “on” (default), the node will use half floats for operations that are supported. This makes the node use less memory and run faster, with a tiny tradeoff in accuracy. We definitely recommend having this “on” for the NNFlowVectorWarp node.
The “About” tab:
There is an additional tab called “About” in the knob panel for NNFlowVectorWarp. This tab prints out some additional info that can be very helpful for trouble shooting. The first section is printing out what type of license that is currently in use, and also how many more days it’s valid for.
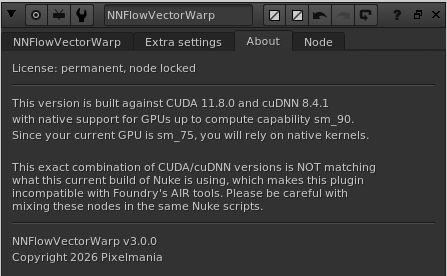
The next section (if you are running a GPU based build) is printing out what CUDA and cuDNN this version is built against. It also lists what compute capability your current GPU is supporting and what max compute capability the current build of the plugin is natively supporting. If also writes out if your current configuration will use native or JIT-compiled kernels. In addition to that, it also writes out if the current plugin build is matching what versions of CUDA and cuDNN that the current Nuke build is using, and hence if it’s compatible with the AIR tools or not.
Finally it’s listing what version of the plugin that is running.
(the screenshot above is just a snapshot of how this info can look, captured on one of our development workstations)