Usage of the node
The NNFlowVector node can produce normal motion vectors that are compatible with how Nuke handles motion vectors, i.e. they become available in the “motion” layer and also as a subset in the “forward” and “backward” layers. These can be used in native Nuke nodes such as VectorBlur, among other third party tools from Nukepedia (www.nukepedia.com). The motion vector output is available, without limits, in the free version of NNFlowVector.
Worth mentioning is that you do want to set the “interleave” option in the Write node to “channels, layers and views” when pre-comping out motion vectors (this is Nuke’s default settings). This way the “forward” and “backward” layers are combined automatically by Nuke to be represented in the “motion” layer as well. If you write out the files with “interleave” set to for example “channels” only, then the “forward” and “backwards” layers become written out in separate parts in the resulting multi-part EXR sequence. This results in Nuke failing to recombine them correctly to the “motion” layer when read in again. You can easily see if this has happened by checking if the “motion_extra” layer has been created instead of the standard “motion” layer.
New in NNFlowVector v3.0 is that you can use the button “Create Write node” to get a Write node that is already set to the correct settings for the vectors NNFlowVector is set to generate.
SmartVector, and the tools that come bundled with it in NukeX, is truly a brilliant invention that opens up for a lot of powerful compositing techniques. The VectorDistort node is the most obvious one which makes it possible to track on images, or image sequences, onto moving and deforming objects in plates. This is made possible by the more complex set of motion vectors called smart vectors. While NukeX is able to produce these smart vectors, they are quite often pretty rough which makes them not hold up for that long sequences. Basically the material you are tracking onto the plates does deteriorate over time. This is where NNFlowVector comes in by being able to produce cleaner and more stable motion vectors in the smart vector format. Hence the output of NNFlowVector is usable directly in the VectorDistort node. This is also true for other smart vector compatible nodes like VectorCornerPin and GridWarpTracker.
You have to use the licensed/paid version of NNFlowVector to be able to produce smart vectors. If you want to try this feature out first, there are free trial licenses available upon request.
New in v3.0: We are shipping our own new node for warping material using the produced vectors, called NNFlowVectorWarp. NNFlowVectorWarp is hence a direct alternative to using VectorDistort, and something we really do recommend to use instead when using vectors generated from the NNFlowVector node. The NNFlowVectorWarp node is directly developed for being compatible with and optimized for vectors generated by NNFlowVector, which will result in even cleaner and more stable tracks/warps/stabilizations.
Knob reference
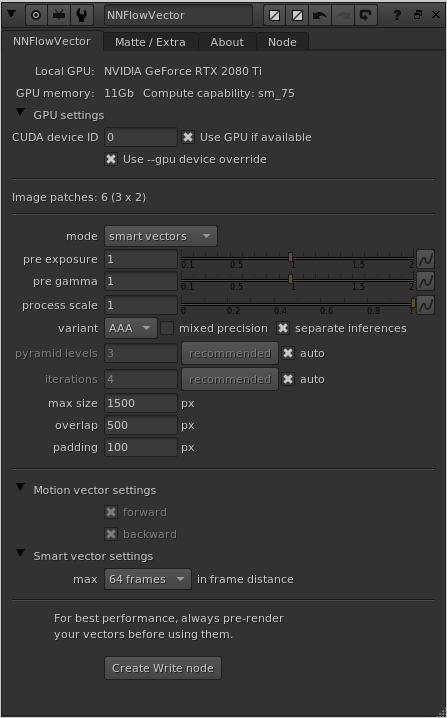
The knobs “max size”, “padding” and “overlap” are mostly related to being able to generate motion vectors for pretty large resolution sequences using limited VRAM on the graphics card. The neural network requires pretty large amounts of memory even for small resolution input sequences. To be able to generate vectors for a full HD sequence or larger, the images most likely need to be split up into several passes/patches to fit into memory. This is all done and handled transparently “under the hood” so the artist can focus on more important things. You might need to tweak the settings though depending on the use case and available hardware on your workstation.
mode
You can switch between generating normal “motion vectors”, and the more Nuke specific “smart vectors”, depending on your need and what nodes you are going to use the motion vectors with.
pre exposure
This is a normal exposure grade correction that is applied before the neural network processing. It is here for artist convenience since it’s worth playing a bit with the exposure balance to optimize your output.
pre gamma
This is a normal gamma grade correction that is applied before the neural network processing. It is here for artist convenience since it’s worth playing a bit with the gamma balance to optimize your output.
process scale
Defines in what resolution to calculate the vectors in. The default value of 1.0 means it’s going to calculate the vectors in the same resolution as the input images (basically this ignores doing a pre-scale). A value of 0.5 means half res, and a value of 2.0 means double res. It’s good being able to alter the process resolution because of rendering speed, memory use and produced details. For example it’s quite often enough to calculate the vectors of UHD material in full HD instead (as in setting the process scale to 0.5). The vectors are always automatically reformatted back to the input resolution and scaled accordingly, so they are directly usable together with the input material. Please have a play with your particular material to find the most optimal process scale setting.
variant
The variant (“A”, “AA” or “AAA”), sets what neural network training variant/model to use. New in v3.0 is the great model “AAA”. This is a big update to the older variants, and we do recommend to always run the “AAA” model. We were close to removing all other variants, but decided to keep the “AA” and “A” models for backwards compatibility/legacy’s sake for now (will probably be removed in a later release). The “AAA” model is similarly lightweight to the old “A” model (in terms of VRAM need), but produces way better vectors that are more detailed and less noisy (a lot smoother overall). It is also much better at handling larger input resolutions.
Note regarding NNFlowVector on macOS:
The “AA” variant is not available to be run using MPS acceleration on macOS, and the “Use GPU if available” knob will automatically be greyed out if you pick it. This is due to some tensor functions not being MPS supported in the PyTorch implementation that comes bundled with Nuke. Please use the “AAA” variant instead.
Another note is that the old “A” variant is not able to be run on macOS in Nuke17.0 using “separate inferences” on, and hence that option will be grayed out in that specific case.
mixed precision
When this is “on” (which is not the default anymore) the plugin will try to use mixed precision on the GPU for calculations. What this means is that for certain supported calculations, the GPU will process data using half floats (16 bit) instead of normal full floats (32 bit). In older versions of the node (v2.3.0 and lower) we recommended to have this turned “on”. But the new “AAA” variant is not behaving as well in mixed precision, and hence we recommend to not have “mixed precision” turned on (and we have turned it off in the default settings as well).
separate inferences
When “separate inferences” is on, the calculation of the forward motion vectors and the backward motion vectors are run as separate inference/calculation passes through the neural network. This takes a little bit more time, but uses less GPU memory which (dependent on your hardware) might be a good thing. When “separate inferences” is set to “off”, the node calculate the forward and backward vectors in parallel using one inference run through the neural network (a touch faster, but uses more memory). The default setting for this knob is now set to “on” (as of v3.0).
pyramid levels
This knob is new in v3.0, and is connected to the new variant “AAA”. It defines how many pyramid levels that the model uses internally in its model structure. This knob is disabled when using other variants than “AAA”.
You also have a button with the label “recommended” next to the pyramid levels knob. This can be pressed to calculate and set the recommended value of pyramid levels which is related to the input resolution.
There is also an “auto” checkbox, which disables the “pyramid levels” knob and the “recommended” button, and instead directly uses the live calculated recommended value internally.
iterations
Defines how many refinement iterations the solve algorithm will do for the chosen model variant. This only applies to the variants “AAA” and “A”, and is hence greyed out if you use the “AA” variant.
Similarly to the workings of “pyramid levels”, there is a “recommended” button and an “auto” checkbox connected to the “iterations” as well. Good to know is that the recommended value for “iterations” is very different for the different variants. For the “AAA” variant we recommend setting iterations to around 4, and for the “A” variant we recommend setting iterations to around 25.
max size
Max size sets the maximum dimension, in one direction, that an image patch can have and is one of the most important knobs on the plugin. The default is 1500, which means that the max dimensions an input patch would be allowed to be is 1500×1500 pixels. From our experience that will use up to around 8Gb of VRAM on your graphics card (applies to the AAA/A variants. For the “AA” variant, please try values in the realm of 700 instead). If you haven’t got that available and free the processing will error out with a CUDA memory error, and the node in Nuke will error in the DAG. To remedy this, and also to be able to input resolutions much higher than a single patch size, you can tweak the max size knob to adapt to your situation. You can lower it to adapt to having much less VRAM available. The plugin will split the input image into lots of smaller patches and stitch them together in the background. This will of course be slower, but it will make it possible to still run and produce much larger results. There is a text status knob above the “max size” knob (in between the two dividers), that will let you know how many image patches the plugin will run to create the final motion vector output.
Since motion vectors do describe local and global movements in plates, they are pretty sensitive to what image regions are part of the algorithm solve. What this mean is that the more it sees the better result it will be able to produce. Keeping the max size as high as you can, will produce better motion vectors. It’s worth to mention that this is much more sensitive in a plugin like this compared to for example NNSuperResolution.
overlap
Since the plugin will run multiple patches through the neural network, there will be lots of edges of image patches present. The edges doesn’t get as satisfying results as a bit further into an image from the edge. Because of this, all these multiple patches that get processed are done so with some spatial overlap. The overlap knob value sets the number of pixels of the patches’ overlap. The default value is 500.
padding
The padding is very connected to the overlap above. While the overlap sets the total amount of pixels the patches overlap, the padding then reduces the actual cross fading area where the patches are blended to not use the very edge pixels at all. The padding is also specified in pixels, and the default value is 100. This way of blending all patches together has proven pretty successful in our own testing.
motion vector mode: forward and backward
Motion vectors describe the local movement of different parts of the plate from the current frame to the next frame (forward), and from the current frame to the frame before (backward). Different tools and algorithms have different needs for what to use in regards to motion vectors, some work with just forward vectors and some need both forward and backward vectors. You have the option of which ones you want to calculate, but we recommend to always calculate and save both.
Worth noting is that all the NNFlowVector Util nodes that got motion vectors as input (please see below in this document) do require both forward and backward vectors. The same is true for the NNFlowVectorWarp node.
smart vector mode: frame distance
The drop down menu specifies the highest value of “frame distance” that you can use in a NNFlowVectorWarp / VectorDistort node when using the rendered SmartVector compatible output of NNFlowVector. If you want to have all the possible options available in a NNFlowVectorWarp node, you should set the frame distance to 64. This will require a lot more rendering time though. If you know that you will only use up to a frame distance of 2, for example, you can optimize the rendering of your smart vector compatible output a lot by only rendering the needed motion layers for that particular setting (and hence set the max frame distance in NNFlowVector to the same setting of 2).
You have to use the licensed/paid version of NNFlowVector to be able to produce smart vectors. If you want to try this feature out first, please request a free trial license.
Create Write node
This is a convenience button that will create a pre-configured Write node for easy pre-rendering of the vectors (which is always the recommended workflow). Please note that the settings are different depending on if you are generating motion vectors or smart vectors. Motion vectors use interleaved channels, while smart vectors use multi-part EXRs.
CUDA device ID
This knob is only present if you’ve installed a GPU version of the plugin. This knob specifies what GPU to use in the system by its CUDA device ID. It’s only relevant if you got multiple GPUs installed in the system. The default value is 0, which is the default CUDA processing device, usually the fastest/most modern GPU installed. Please refer to the output of running the command “nvidia-smi” in a terminal for retrieving the info of the specific GPU device IDs you have assigned to your GPUs in your particular system.
This knob does NOT exist in the macOS build (since the macOS build is accelerated by MPS instead of CUDA).
Use GPU if available
There is another knob at the top of the plugin called “Use GPU if available”, and it’s “on” by default (recommended). This knob is only present if you’ve installed a GPU version of the plugin. This knob is not changing the motion vector output, but rather how the result is calculated. If it is “on” the algorithm will run on the GPU hardware of the workstation, and if it’s “off” the algorithm will run on the normal CPU of the workstation. If the plugin can’t detect a CUDA compatible GPU, this knob will automatically be disabled/greyed out. This knob is similar to the one you’ll find in Foundry’s own GPU accelerated plugins like for example the ZDefocus node.
We highly recommend always having this knob “on”, since the algorithm will run A LOT faster on the GPU than on the CPU. To give you an idea of the difference, we’ve seen calculation times of the same input image be around 2.0 seconds/frame using the GPU and about 34 seconds/frame on the CPU (a difference factor or 17x slower on the CPU). These numbers are just a simple example to show the vastly different processing times you will get using the GPU vs. the CPU. For speed references of processing, please download and test run the plugin on your own hardware/system.
Use –gpu device override
This is a new knob in v3.0, and is there to help with batch rendering on systems with multiple GPUs. When this knob is set to “on” (which is the default), then node will not blindly use the device ID set in the knob “CUDA device ID” but will rather adhere to the –gpu command line parameter (from the command that started the nuke batch render). This means that NNFlowVector will behave like Foundry’s own GPU accelerated nodes, and render using the specified GPU in the Nuke batch render command. This enables you to have a setup in the GUI, when you are working with the node as an artist, but still be able to farm the exact same Nuke script on different boxes with different GPU configurations.
The “Matte / Extra” tab’s knobs
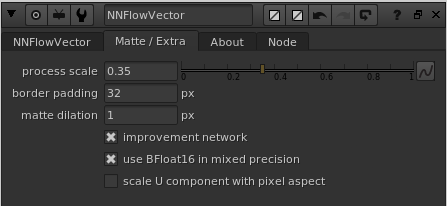
process scale
This knob specifies at what resolution the matte region should be calculated in, i.e. the calculation of the inpainting and enhancement of the “ignored” matte region specified by the alpha channel of the matte input (the white regions in the alpha, i.e. values of 1.0, are the ones that are getting inpainted). This process is rather compute and memory heavy, so it’s good to keep this at a rather low ratio to not run out of CUDA memory (GPU VRAM). The default value is 0.35.
border padding
The border padding setting is only relevant if your input matte is touching any of the edges of the image. If it is, then some extra inpainting steps needs to be performed and it’s here the “border padding” is relevant. If you are getting artifacts at the image edge in the matte region, such as black bleed-ins, then try to increase/change the border padding. The default value is 32 pixels.
matte dilation
The matte dilation setting is specifying how many pixels to dilate the matte before it’s used for the inpainting and improvement neural network. Because the original matte is used to actually keymix in the calculated vectors in the matte region, this dilation setting makes the end result not use the furthest out pixels produced by the algorithms. The setting basically makes is possible to ignore the outer edge of the produced matte region which is good because it can have some noisy artifacts in some cases. Keep this value as low as possible, even set it to 0, as long as you’re not experiencing the edge artifacts. If you get them, slowly increase this setting. The default value is 1 pixel.
improvement network
This setting should pretty much always be “on”. It turns the improvement neural network on/off. If it’s set to “off” you will instead only get the pre-processing done before the vectors are fed to the neural network. This will be similar to what a classic “Inpainting” node in Nuke looks like, or a “Laplace region fill” if you’re more into math.
Use BFloat16 in mixed precision
If this knob is “on”, it will change the data type used in mixed precision processing from classic half floats (16bit) to bfloat16 (if your GPU is modern enough to support it). This is usually better and you should keep this on (default).
scale U component with pixel aspect
This knob specifies if the pixel aspect should be multiplied into the U component of the output vectors or not. This is only relevant when working with anamorphic material (i.e. non-square pixel aspects). The default is “off” which is usually what you want, but we expose this setting to handle cases where it’s needed.
Knob demo video
We haven’t got a video introduction to the knobs for NNFlowVector yet, but if you are interested in the “max size”, “padding” and “overlap” knobs, please watch the following demo of NNSuperResolution since the same info applies for those knobs: